Introduction
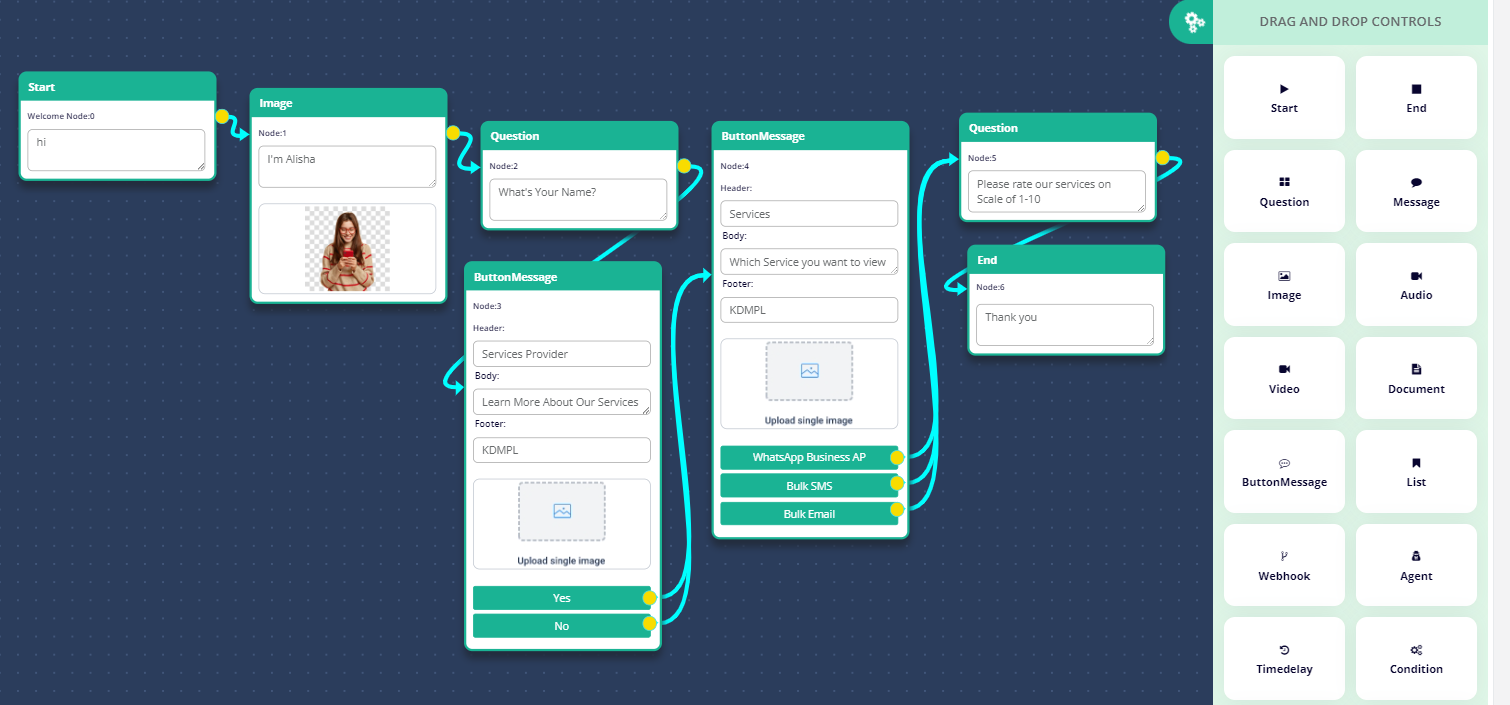
WhatsApp chatbot drag and drop editor is a unique solution that can be used by enterprises to design the flow as they want for the interactions they wish to automate with their client. This is a move towards No Code development.
The Editor consists of 5 Main Parts:
Configuration Part
In this part, enterprise can
- Name the Chatbot
- Save & Exit
- Export the Json format
- Import the Json format
- Chabot Guide pdf format

Drag and Drop Controls
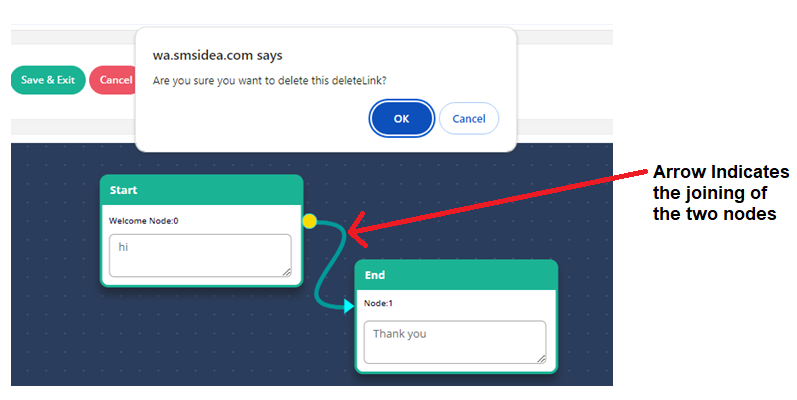
- You can delete a connection between two connector nodes. If the user selects ‘Ok’ then delete is done, else if ‘Cancel’ is clicked nothing happens. In below, dig. You can see the arrow on between two nodes. In below diagram, we can explain it.
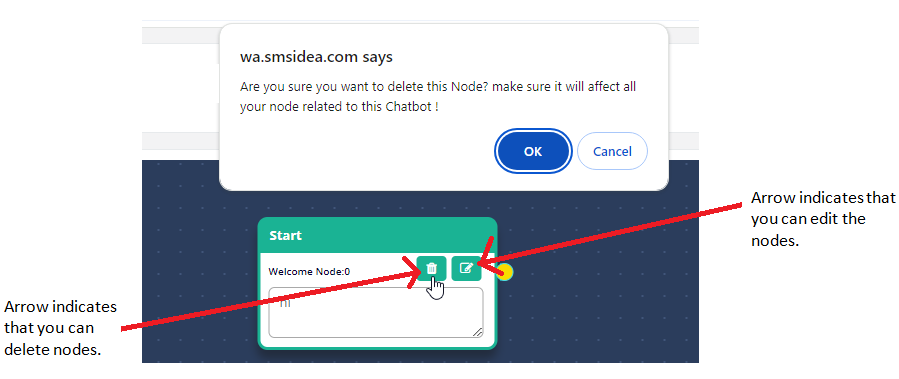
- You can click on the delete button so the node can be deleted. If the user selects ‘Ok’ then delete is done, else if ‘Cancel’ is clicked nothing happens. In below diagram, we can explain it.
From this part, enterprise can use various Actions that the bot should take on a given sequence. The various Elements Include:
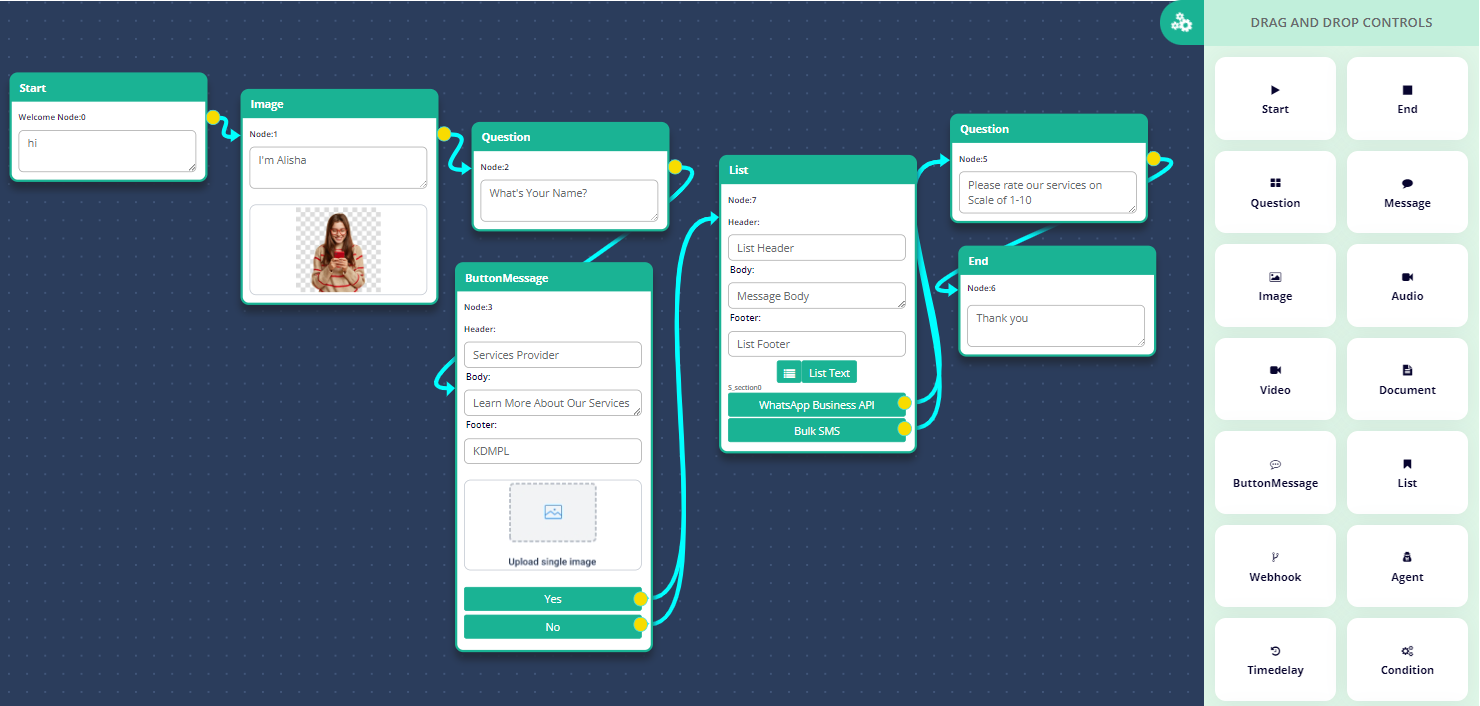
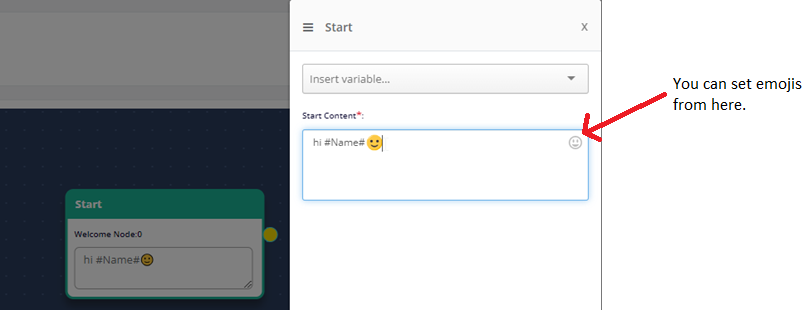
Start:
This action is the Starting Message or the Welcome message when the Chat Bot is Initiated. Enterprise can define a WhatsApp Text Message in this Action. If you want to select variable, then you can select it (e.g. #Email#), but in case you don’t want to select the variable then also you can write the content (e.g.Hello). In below diagram you can see the example for this.
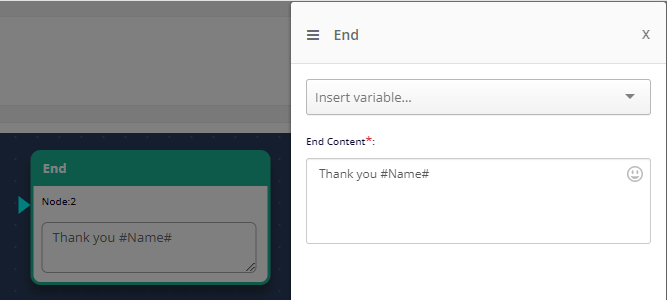
End:
This action is the Ending Message or the ending message when the Chat Bot is completed.
Questions:
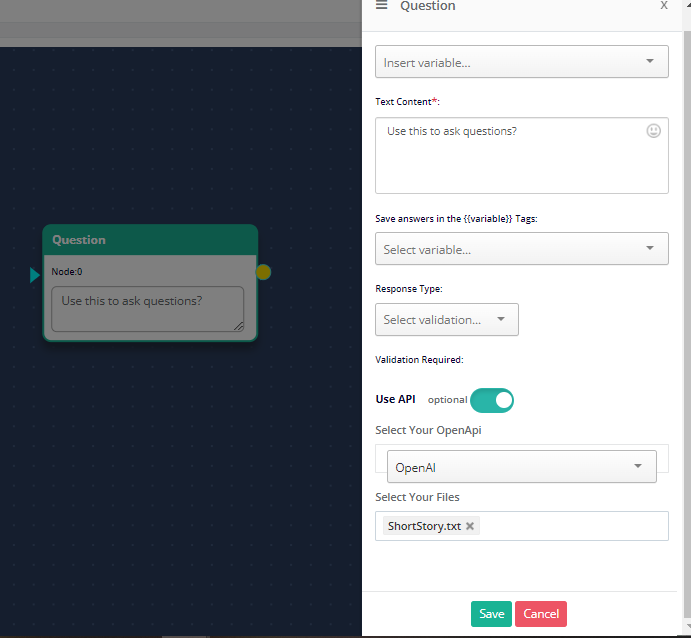
This action can be used when Enterprise wants to Ask a Question to the user and capture the Response. In this action only a WhatsApp Text type question can be fired and the Bot will Wait for the User Response to move ahead to the next sequence. Message Content can be customized by using Variables. Also, the answer received against the question can be Saved as a variable. For eg. If the question asked is like “What is your name?” and the User Answers “Jon Doe”, then you can select the variable “Name” in “Save answers in the Variable”Option. And the same will be stored as “Name” variable
Message:
This action can be used when Enterprise just want to send a series of Informative Messages without waiting for the User Response. The bot will fire this action and directly move to the Next sequence Action.
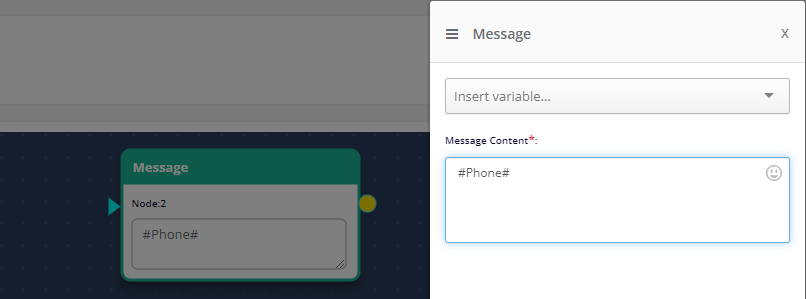
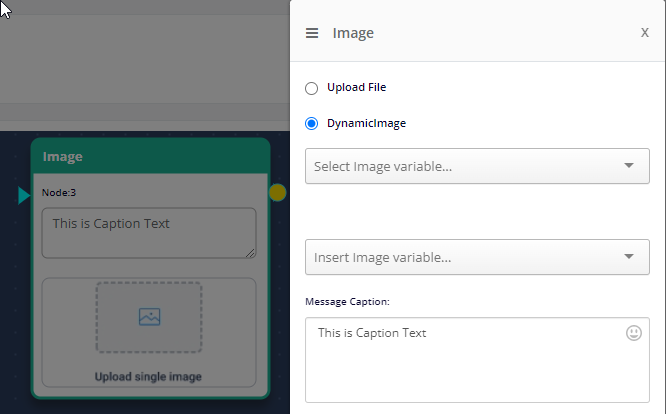
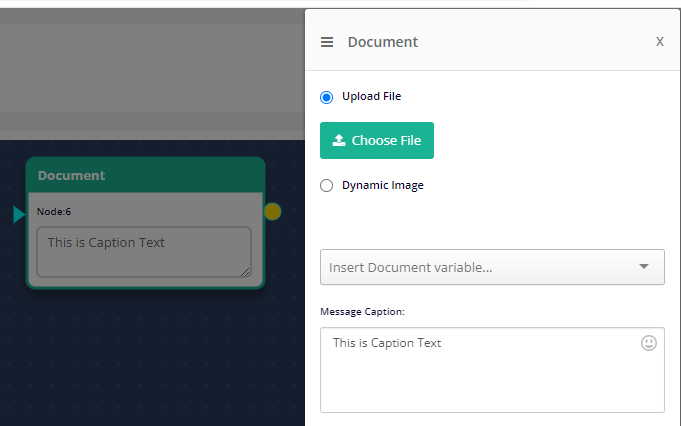
Image:
This action is a WhatsApp Message with Image and Caption Text. User can upload an Image and Text that will be fired as an Informative Message without waiting for the User Response. The bot will fire this action and directly move to the Next sequence Action.
- Upload File : Below diagram show the Image node. In this you can upload file from choose file. Click on choose file and select image.
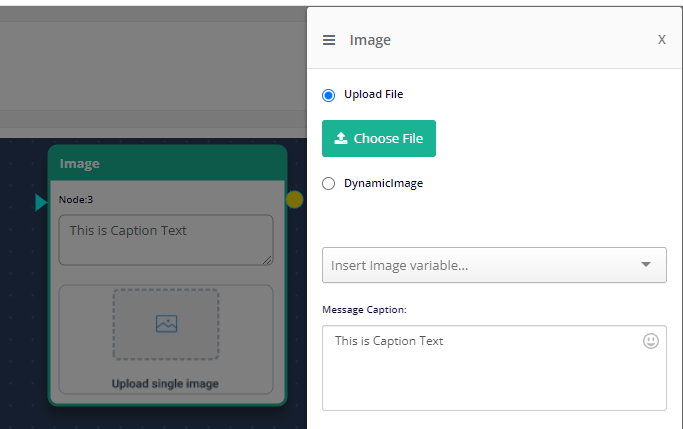
- Dynamic Media File (Image, Audio, Video, Document) : To select Variable you can choose variable dynamically.
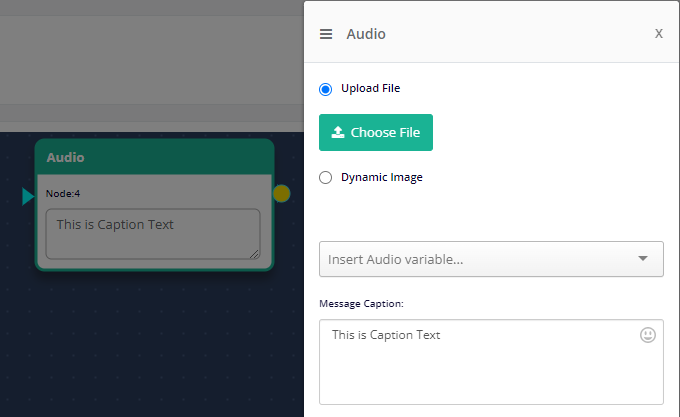
Audio:
This action is an Audio WhatsApp Message. User can upload an Audio File that will be fired as an Informative Message without waiting for the User Response. The bot will fire this action and directly move to the Next sequence Action.
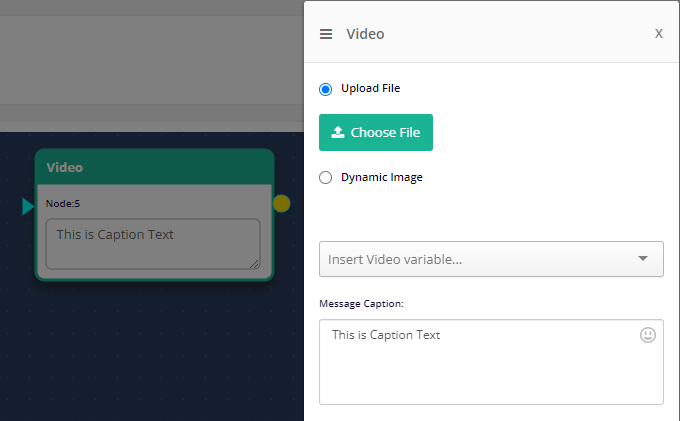
Video:
This action is a Video WhatsApp Message. User can upload a Video File that will be fired as an Informative Message. The bot will fire this action and directly move to the Next sequence Action.
Document:
This action is a Document WhatsApp Message. User can upload a PDF Document File that will be fired as an Informative Message without waiting for the User Response. The bot will fire this action and directly move to the Next sequence Action.
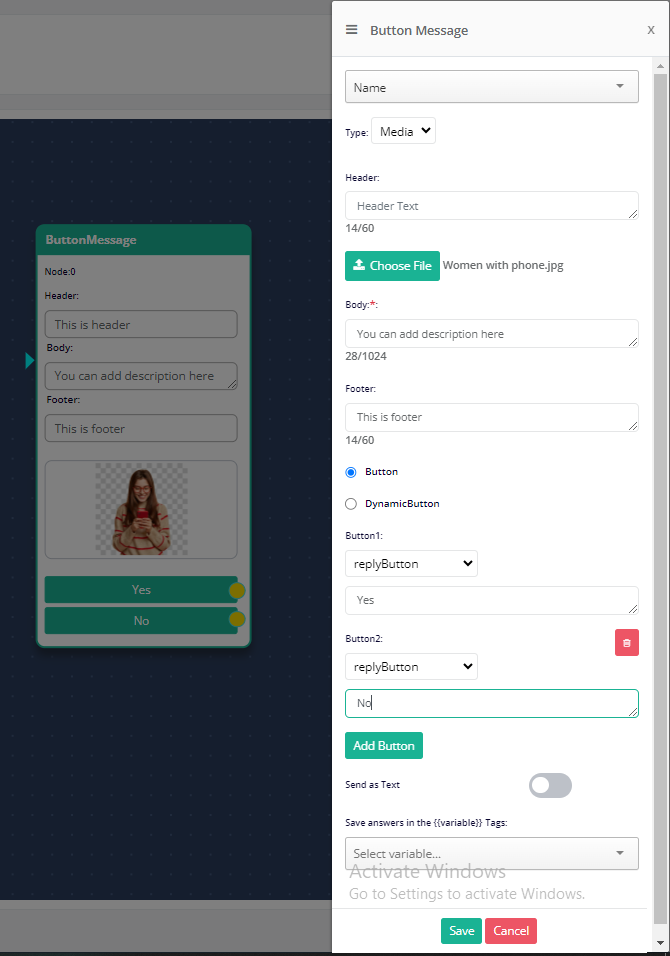
Button Message:
This action can be used to fire a Button type Whatsapp message.
This type consists of 4 components:
- Media (Optional) : Enterprise can add Image, Video or Document
- Title: The Heading of the Message
- Description: The Description of the Message
- Buttons:
- Text Reply: In which the Button Text is returned as a response if a user clicks on it
- URL: In this the user is redirected to the Landing URL that is configured
- Phone: In this the user is redirected to calling app with the Pre-defined Number in the calling pad.
This is also a Question type message in which the Bot will wait for the user response to decide the next flow of sequence. Enterprise can add up to 3 Buttons. Whatever Text Reply is received can be stored as a Variable. And the next sequence can be fired based on the Button Response.
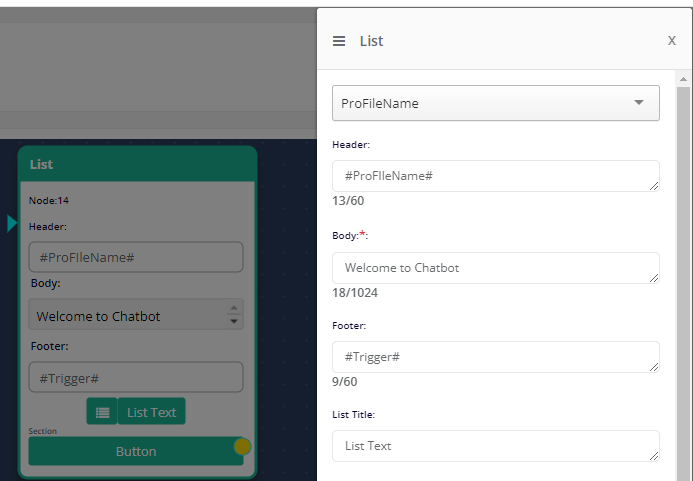
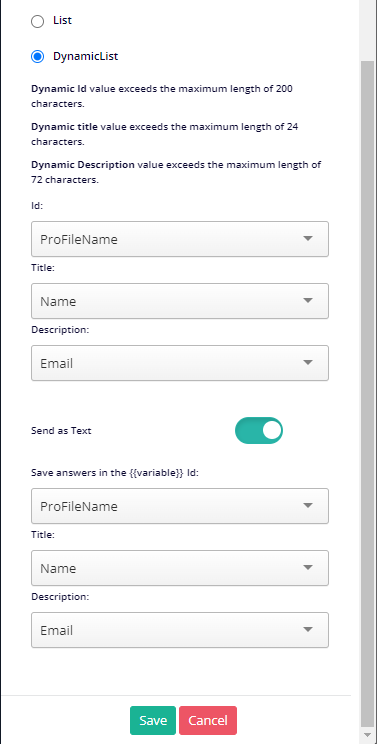
List:
This action can be used to fire a List WhatsappMessage.
This type consists of 4 components:
- Header : The Header of the Message
- Body : The Description of the Message
- Footer : The Footer of the Message
- List Title : The List Title of the Message
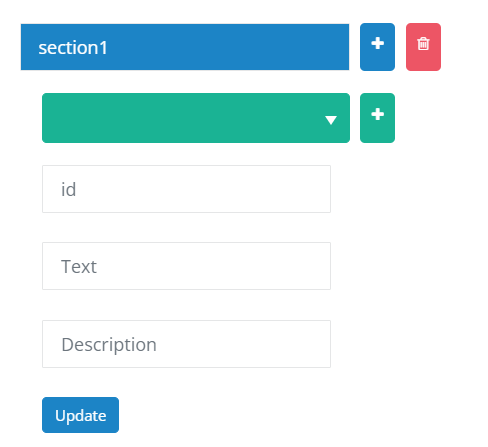
Section : In this you can set the title for the Section. (e.g. Section1)
Row :
- Keyword : In this you can set your Keyword.
- Text : Set the text of the Section.
- Description : Write a Description here.
Once you can fill the data, then click on update button so the data will store. Below diagram show the example for Section.
This is also a List type message in which the Bot will wait for the user response to decide the next flow of sequence. Enterprise can add Multiple Section.
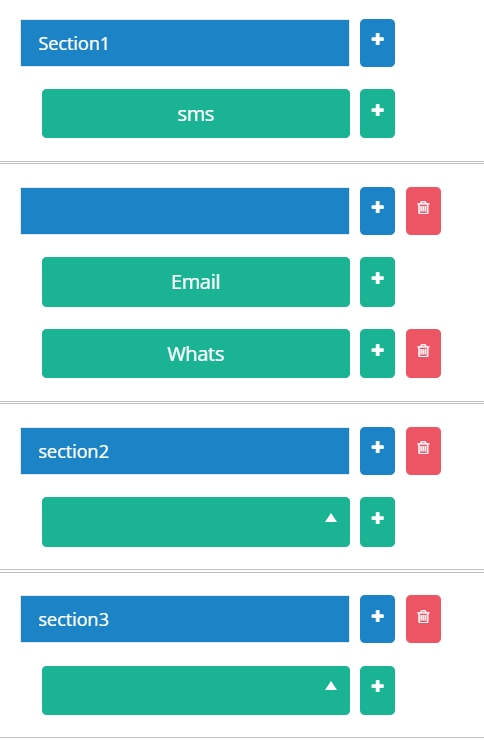
Text List : Below Diagram shows that if toggle is ON than list box works as it is but if in case toggle is OFF then it will convert its value in text format.

Webhook:
This is a very dynamic Action of the editor. By webhooks, you can retrieve (GET) or send (POST) data from one place to another. Following is the breakup of the Action elements
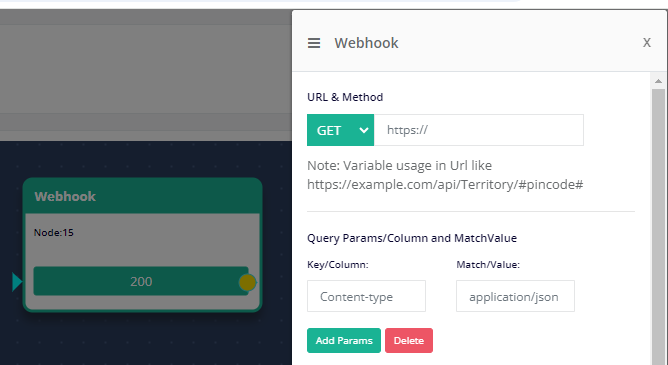
- URL & Method: This is where you can choose GET Method or POST Method And your URL endpoint of the external API.
You can also make your URL Dynamic by inserting variables from the variables button shown in the image above.
To add variables, you should always do it in the URL Path.
Example: URL ⟶ https://webhook-wa-testin.com/16d6942a-64cb-43f3-8e8a-2bddace647f3?n ame={{name}}
- Customize Headers: Headers in HTTP webhook requests are generally used to specify the purpose of this webhook or the content type it contains. It is completely optional to use headers, and it is by default set as off.
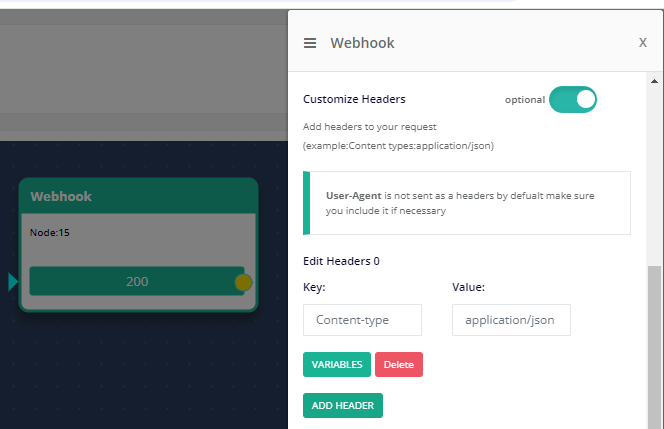
As shown in the above picture, you can set headers as key-value pairs, and then later when you set the request, it will be sent in the Headers.
Example: key = Content-Type , value = application/x-www-form-urlencoded so it will be sent as
ldquo;Content-Type : application/x-www-form-urlencoded”
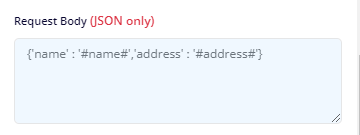
- Customize the body: In this you can send information in the body of the webhook request, this is also completely optional and set as off by default.
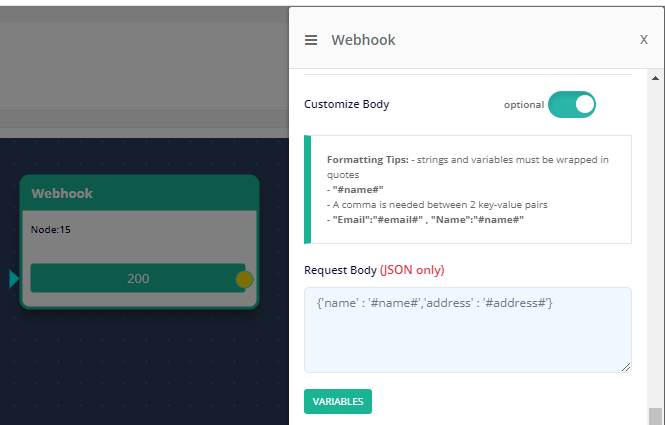
This is written in JSON format, or else there will be an error. An example of how the body request should look like:
{
“name” : “#name#”, “address” : “#address#”
}
- Set your test variable: Manually setting your test variables here.
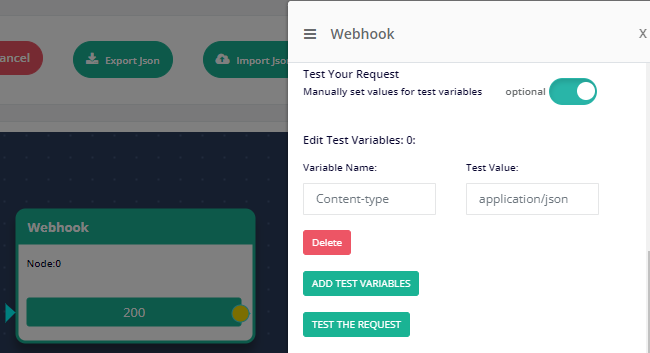
- Test the Request: You can test the API request by clicking on the ‘Test the Request’ button.
- Save Responses as Variables: You can also save the response to a request as variables whenever you trigger the webhook method. Now you can either choose to make it a custom attribute or save it as a variable.
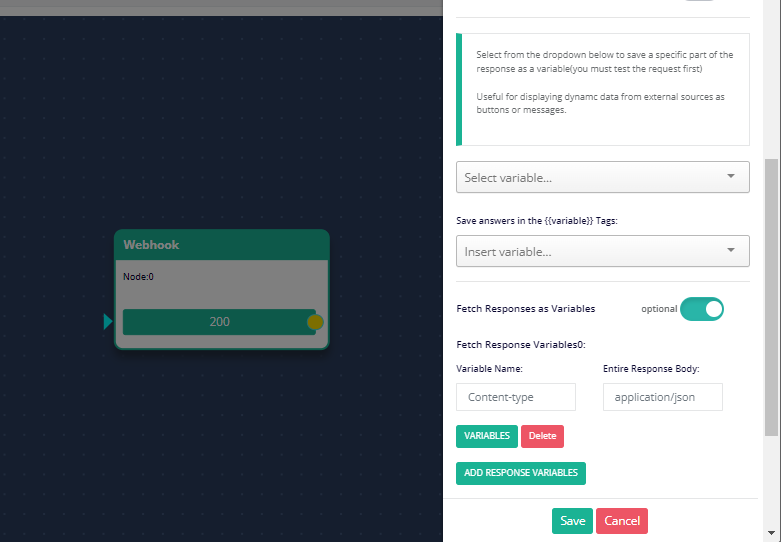
If your API response is a JSON with key-value paid, you can store each of the values by passing the key name.
For example, if you receive a Response :
{
“Balance”: “Rs. 5000”
}
And you want to store “Rs. 5000” from this response, You need to store it as below –
In “Variable Name” : Select an existing Variable or create a New Variable
In “Entire Response Body”: Mention “Balance”
Once you do that, you can type in your variable or custom attribute and save the entire response.
Storing Responses Inside Object
If you want to store the response value that is inside an object, you need to use the object key. key name
Example :
{
“Result”: {
“MobileClientInfoStatus”: “OpenQuote”,
“PolicyId”: “00000000-0000-0000-0000-000000000000”,
“QuoteId”: “xxxxx”,
“CustomerId”: “xxxxxx”,
“QuoteNumber”: “xxxxxx”,
“PolicyNumber”: null,
“LmsStatus”: false,
“BucketKey”: null,
“Quote”: null
},
“MessageValidation”: null,
“QuoteReferrals”: null
}
If your response is like above, and you want to store the QuoteId, just use Result. Quoted
Storing Responses Inside Object
If your response is inside an array of any object like below –
[
{
“tracking_data”: {
“track_status”:1,
“shipment_track” : [
{
“id”:1278937320,
“current_status”:”Delivered”
}
]
}
}
]
You can use this to store –
$.[0].tracking_data.shipment_track[0].current_status
- Response Routing: You can use response routing in your flow so that whenever a request status matches the expected status it follows the flow according to that.
Example:
200 – Okay Request
400 – Bad Request
Here you can split your flow according to response status codes.
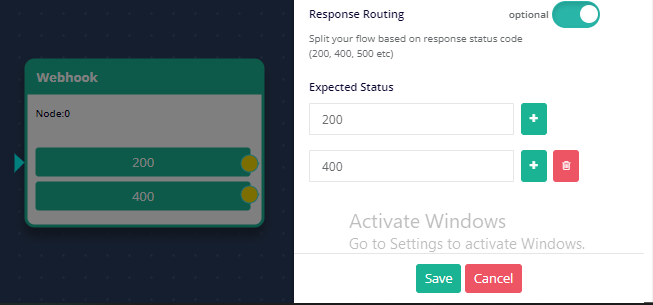
Now, you can set up messages following them. Suppose, for status = 200, I will send a message saying, “Message Sent Successfully”.
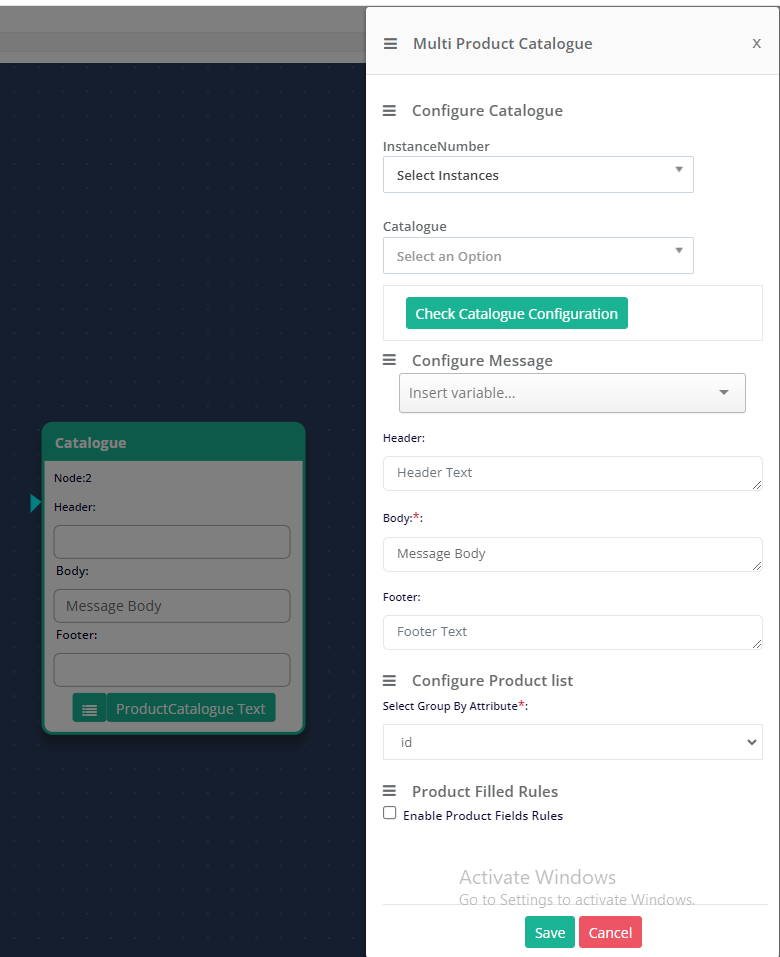
Multi Product Catalogue:
Catalogue use spans across various domains such as shopping, where customers browse through printed or online catalogues to explore products and make purchases. In marketing, catalogues serve as powerful tools for businesses to showcase their offerings, attract potential customers, and drive sales. Additionally, in reference materials, catalogues provide structured information, aiding in research, education, and easy access to specific resources.
Configure Catalogue
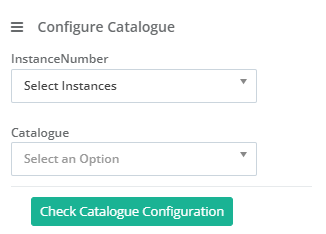
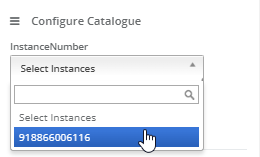
If an instance number is not selected, the catalogue dropdown will become disabled.
When you click “Check Catalogue Configuration,” you will be redirected to Catalogue Settings, where you can review and add your catalogue configuration.
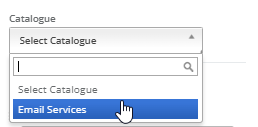
- Instance Number: Here you can choose the Instance Number.
- Catalogue: Here you can choose the Catalogue which is already configured.
Configure Message

This type consists of 3 components:
- Header : The Header of the Message
- Body : The Description of the Message
- Footer : The Footer of the Message
Configure Product List
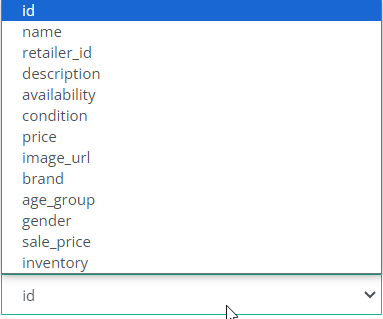
- Select, Group By Attribute : Here you can select a grouping attribute.

Product Filled Rules
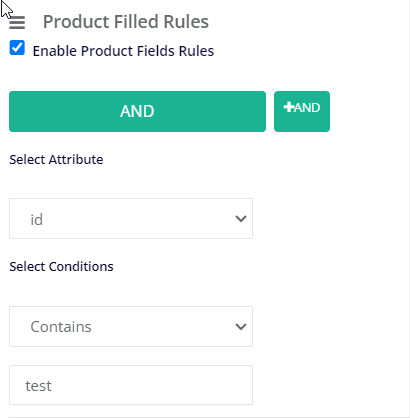
- Select Conditions:
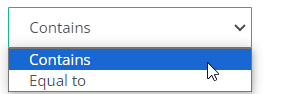
In the “Select Condition” dropdown, we have two options.
- Contains : The outcome will depend on the selected attribute. For instance, if we choose “name” as the attribute, and then select “contains”, and input “abc” in the text field, the system will display the catalogue items that match the name containing “abc”.
- Equal to : The outcome will depend on the selected attribute. For example, if we choose “name” as the attribute and then select “equal to”, and input “abc” in the text field, the system will display the catalogue items that exactly match the name “abc”.
Bot Transfer
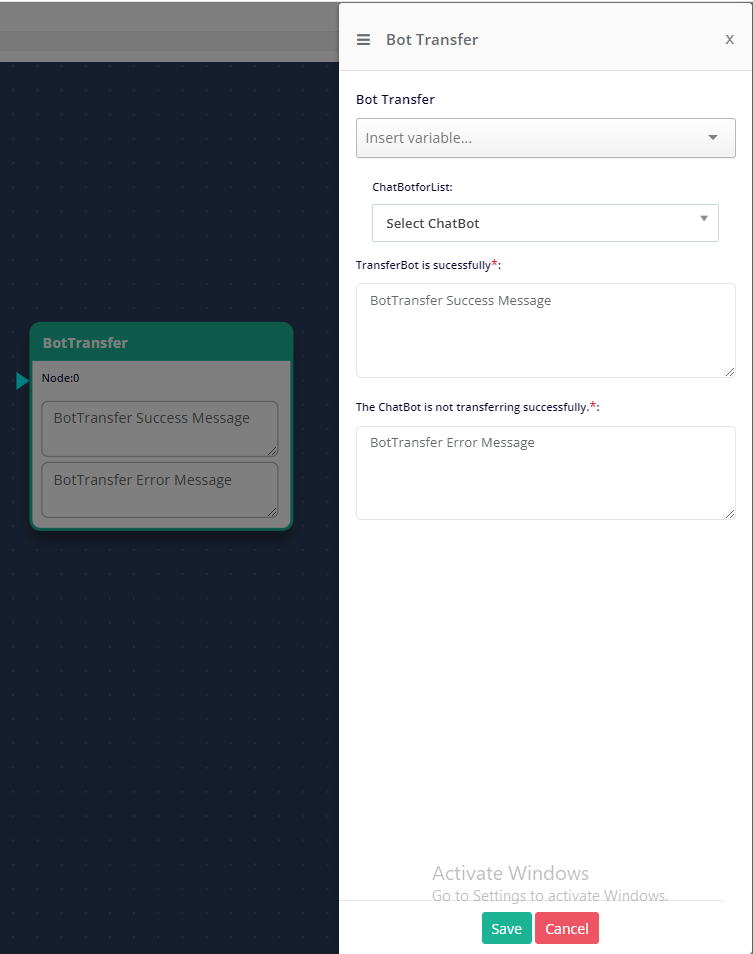
Using this bot transfer, we can transfer bot from any node based on customer inputs. Like if you have created different bot for each language, then based on user selection of language you can transfer bot using this node.
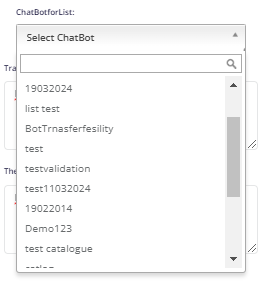
- ChatBotforList : Here, you can view all your chatbot lists.
Flow Screen
In this Screen Enterprise can design the Flow and the sequence and set up the rules of the flow.
- Button Message
- List and Button Message